Wherever corn was grown as a crop, children, in both Native American and Colonial American families, used husks to fashion dolls. Follow these simple instructions and refer to the accompanying diagrams to create your own unique doll.Materials Needed:
- string
- scissors
- a bucket of water
- bags of cornhusks- most easily purchased (dried, cleaned and in uniform sizes), at a local craft store
- cornhusk doll diagram page (print out)
Directions:****Before beginning, soak cornhusks in a bucket of water until they are soft and pliable.****
Take four cornhusks and arrange them in as shown. Using a small piece of string, tie the straight ends together tightly. Trim and round the edges with scissors. Turn upside down and pull long ends of husks down over the trimmed edges. Tie with string to form the "head." Take another husk, flatten it, and roll into a tight cylinder. Tie each end with string. This forms the doll’s arms. Fit the arms inside of the long husks, just below the "neck." Tie with string, as shown, to form a "waist." Drape a husk around the arms and upper body in a criss-cross pattern to form "shoulders." Take four or five husks, straight edges together, and arrange around waist.
These form a "skirt" for the doll.Tie with string. If desired, follow the diagram to form legs for the doll. Tie legs with small strips of husks as indicated. Finish off the doll by tying small strips of husk around the neck and waist to hide the string. Small scraps of cloth may be used to dress the doll.


Felt and Wire Angel
Cut out two of each piece. Sew like pieces together using a running stitch, about 1/4” or slightly less from the edge, and contrasting embroidery thread. Tie small knots for her eyes, hiding the ends of the thread inside her head.


Slide the head onto the wire so it’s between two stitches at the top of the head and the ends are on either side of a stitch at the bottom of the head. Push it all the way to the top, where the twist starts

Slide the body on the same way , pushing it up next
to the head.

Using a pair of needle-nosed pliers, curl the feet up, using about an inch of wire at the bottom of each leg.

Attach the wings using hot glue, making sure they are glued to both the head and body.

I think these would make cute gift tags. If you’re a talented embroideress, you could stitch the recipient’s name onto the dress!


Pumpkin Seed Poinsettia

pumpkin seeds
cardboard
glue
gold cord
coriander seeds or any round seed or bead
red spray paint
gold paint
I love these! Even though we don’t get trick-or-treaters on Halloween where we live, my husband and I always carve a pumpkin. After he scoops out the seeds, I wash them off in a colander, spread them out on a cookie sheet and place them in a warm oven until they are dry. Once dry, you’ll see they have a thin skin on them, it takes a little effort to rub the skin off, but it's worth it once it comes to painting. Store your seeds in an air tight container until you are ready to use them.
For the base of the poinsettia, cut a 1½ inch circle out of the cardboard. Starting from the outside edge of the cardboard, glue seeds overlapping the cardboard a quarter of an inch
all the way around the circle. Glue another row inside the first and a third row inside the second for the center. After the glue is completely dry, paint with red spray paint. For the center of the flower glue three seeds, painted gold, or beads to center of the flower. Glue the 7 inch piece of gold cord folded in half to the back.
These ornaments would also be nice painted white or made using different seeds such as sunflower for a different look.
Handmade Christmas Ornaments

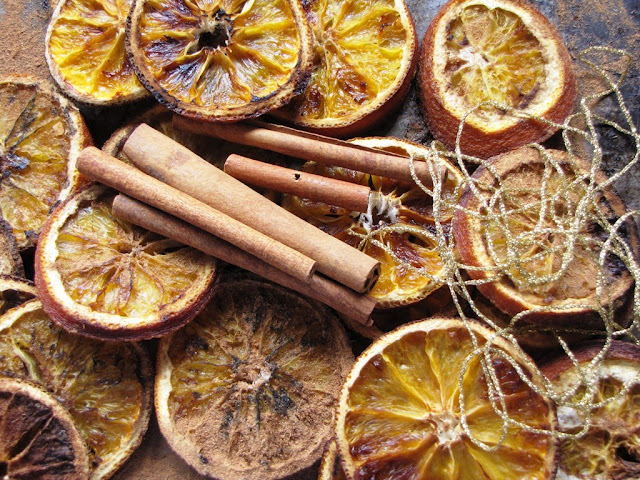
Today we decided to make these citrus and cinnamon
Christmas Ornaments. Our home has this beautiful
fragrance wafting throughout , it is heavenly .

Erin is busy with her ornament…

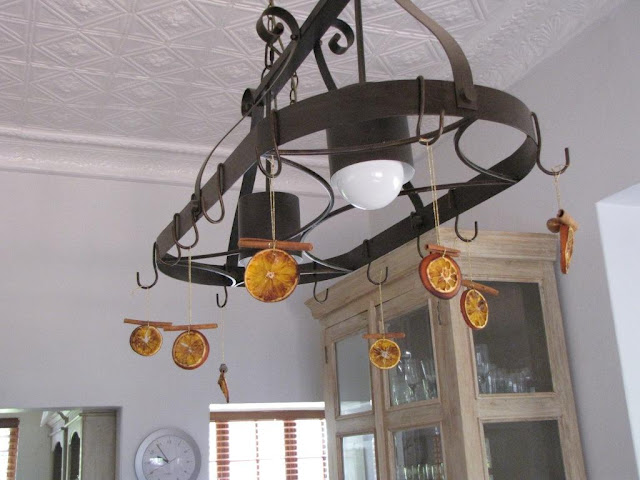
We decided to hang them in our kitchen so we can enjoy them...
To make:
You need a few oranges,
Cinnamon sticks,
Golden thread, or thread of your choice,
Thick wool needle,
Pin hammer,
Acorns etc…
We dried out our orange slices in the oven on a low heat and added some ground cinnamon to the slices.
Knock the wool needle through the cinnamon stick to make an opening and then thread the needle with your strand of golden thread and attach the orange slice to the stick. We also now added an acorn etc… to our ornament and tied them all together. Tie a little knot with your thread and your ornament is ready to hang up for everyone to see… Enjoy!
Pom Pom Pumpkins

Supplies needed to make your own fall crafts pom pom pumpkins:
- Orange Yarn
- Cinnamon Sticks
- Green Felt Trim
- Flower Felt Trim
- Buttons
- Mini Kraft Tag
- Scissors
- Hot Glue Gun/ Glue Sticks

Let’s get started!
I chose to use a cardstock card as my base to wind the yarn around. This is a standard A2 card size.

You can choose whatever you like to wind your yarn- even your own hand will work great!
Begin winding your yarn.

Keep winding!

I chose to wind around my card base about 100 times. Just keep going until you have a nice, thick pile.
Trim the end of the yarn from the skein.
Then cut off a section of yarn, about 12″ long.

Carefully slide your yarn off of the card.

Using your 12″ section, tie the yarn around the middle.

Tie the yarn tight, but take care not to break the yarn. Tie a knot.
Then, using scissors, begin cutting the yarn loops.

continue to cut all the loops, until you have a finished pom pom!

Your pom pom will most likely be uneven in areas. Just give it a little haircut to even it out.

Keep in mind, you are making a pumpkin- so it does not need to be perfect.

Then, look for a nice spot to add your stem.
Trim a cinnamon stick to your desired length.
I tried trimming the cinnamon stick with pliers- I had better luck just snapping it with my hands.

Apply a generous amount of hot glue to the tip of the cinnamon stick.

Press and hold the cinnamon stick in place until the hot glue dries.

Tie the top of the cinnamon stick stem with green felt ric rac.

Cut apart flowers from the felt flower trim, and add a button to the center.

Hot glue the flower to the center of the tied green felt trim.

The last little finishing touch I added to these adorable fall crafts was a mini kraft tag that says “Happy Fall.”
You could personalize your pom pom pumpkin any way you like!
Experiment with different weights and colors of yarn!

A whimsical (and warm!) welcome to Fall.
No-Sew Bandana Pumpkin
It only takes about 10 minutes

Supplies needed to make your own no-sew bandana pumpkin DIY:
- A 22-inch Bandana
- Bean Bag Fill (1 lb for each pumpkin)
- Hemp Twine (I used 20 lb weight, but anything bigger would also work fine) – you will need about 6 feet, depending on how long you make your pumpkin stump. 6 feet should cover 2 inches.
- Craft Scissors
- Rubber Bands to stabilize it while you work (optional)
Find the center of your bandana, and cinch it up by about a 1-inch radius. These extra pleats will help your pumpkin to hold a rounder shape. I used a rubber band for this, but you could easily tie a piece of twine on tightly instead.

Carefully add your bean bag fill, and bring the sides up, gathering them at the top. Wrapping a rubber band around the top to secure it will make your work easier. I added a pair of rubber bands to mark where I planned to cut my “stump.”
Separate out one of the long corners. Take a sharp pair of craft scissors and trim off all the excess fabric except this one corner. This will be your pumpkin “leaf.”

Tie one end of your hemp twine around the base of your pumpkin stump. Take the leaf/fabric corner, and cover over the raw edge of the stump. Now, wrap the stump (including the leaf fabric) tightly with your hemp twine. Wrap upward until you have covered the whole stump. Once you reach the top, wrap downward. When you reach the base of the stump, cut off your excess twine and tie the two ends together. Your leaf should cover this knot.

Now you have an easy and fun pumpkin DIY craft perfect for the fall season! What colors would you use this year?

Angel

MATERIALS:
About 2(to be safe) yards of unbleached muslin
Raffia
Styrofoam ball (about 8 or 9 inches around)
Christmasy embellishments, i.e. holly, poinsettia, ribbons, etc.
Glue gun
HOW TO DO IT:
1. Rip strips of muslin roughly 45 inches long and 1 1/2 inches wide. These will be looped over the Styrofoam ball to make the head and body, so periodically check your strips against the head to gauge whether or not you have enough strips.

2. Start looping the strips tightly over the ball(it should rest in the "middle" of the strips) to cover the head and make a smooth "face".
3. Using a scrap of muslin, tie the strips together tightly under the head to form a "neck".
3. Using a scrap of muslin, tie the strips together tightly under the head to form a "neck".

4. Next are the arms. Rip strips of muslin about 25 inches long and 1 1/2 inches wide. Line them up together neatly and fold so that each end meets in the middle. The ends should overlap about an inch or so. With a thin scrap strip, tie the strips together in the middle.


5. Holding the body, separate the hanging strips equally into 2 bunches and place the arms between the 2, up close against the neck.


6. Now tie strips together below the arms with a scrap strip and voila! There's your waist and arms. The body is complete.

7. Decorate your angel by using your glue gun to make a holly wreath for her head, a poinsettia belt at her waist, or whatever else you like.

8. Make a large bow with long pieces of raffia and hot glue to the back of your angel.
9. Tie a strip of muslin to the back of your angel in a loop to be used for hanging.
9. Tie a strip of muslin to the back of your angel in a loop to be used for hanging.
No comments:
Post a Comment