Wine Cork Shamrock Crafts for St.Patrick's Day
You will need green paint,
a tiny paintbrush,tape,
and three wine corks
Start by aligning the three wine corks so that
they make a flat top,
then tape them together.
I used washi tape just because it was
green but it really didn’t stick too well!
green, or have the kids dip them from
a plate. Stamp the corks against
a piece of paper
and push really hard.
Add some shamrock stems with the little paintbrush to
finish them off!
Hear a few thing you can make as well
doesn't say how to make them but you can see it.
St. Patrick’s Day Tissue Paper Topiary
You will need:STYROFOAM Brand Foam: 12” cone
Tissue paper in three shades of green, plus white (I found white tissue paper with gold polka dots at Target)
Gold coin
Low-temp glue gun
Optional: Thick, white craft glue
Tools needed: Scissors; tape measure; straight pins
To make a St. Patrick’s Day Tissue Paper Topiary:
Cut a strip 12” long and 5” wide from a double layer of tissue paper. Fold in half to measure 12” long x 2-1/2” wide. Your tissue paper strip should now have four layers.
Hold the layers together, and cut fringe along the open, 12” edge. Make about 4 – 5 cuts per inch. It doesn’t have to be perfect, and it will go faster than you think.
Wrap the fringed strip around the base of the 12” cone and pin in back. Adjust as needed so the strip is straight. Optional: Spot glue in place with white craft glue.
Wrap the tape measure around the cone, about 1” above the last fringed strip. This will be the width for the next paper strip. Continue to wrap the cone in fringed tissue paper strips, completing seven rows.
For the last three rows, cut your tissue paper strips 3” – 4” wide, so they measure 1-1/2” – 2” wide when folded. This will make it easier to wrap the strips around the narrow top of the cone.
Glue the gold coin to the top
THE HISTORY OF ST. PATRICK'S DAY
May your blessings outnumber
The shamrocks that grow,
And may trouble avoid you
Wherever you go.
–An Irish Toast
St Patrick's Day is celebrated annually on March 17th, the traditional religious feast day of St. Patrick and the day he is believed to have died in 460 A.D. The Irish have observed this religious holiday for thousands of years. But, how did we come to celebrate St. Patrick's Day in the United States?
WHO WAS ST. PATRICK?
St. Patrick painting
St. Patrick is the beloved patron saint of Ireland. The Irish are famous for spinning exaggerated tales, so despite the infamous stories traditionally attributed to St Patrick, quite little is actually known about his life. We do know that St Patrick was born in Britain and that at the age of 16 was captured by Irish raiders who attacked his family's estate. He was then transported to Ireland where he was held captive for six years, living a solitary, lonely life as a shepherd. It was then that he became a devout Christian, embracing his religion for solace. From his writing, we know that a voice, which he believed to be that of God, spoke to him in a dream, urging him to leave Ireland. He did. Walking nearly 200 miles, Patrick escaped to Britain and undertook seriously religious training.
After 15 years of study, Patrick was ordained as a priest and sent to Ireland. His mission was to minister to Christians and to convert the Irish, then pre-dominantly pagans, to Christianity. Because Patrick was familiar with the Irish language and culture from his years of captivity, he chose to incorporate Irish ritual and symbols into his teachings rather than to eradicate Irish beliefs. Thus, was born the Celtic cross. Patrick superimposed the sun, a powerful Irish symbol, onto the traditional Christian cross so that the result would seem more natural to the Irish.
Traditional Celtic Cross
WHY DO WE CELEBRATE ST. PATRICK'S DAY
Believe it of or not,the first St. Patrick's Day parade was held in new york city on march 17,1762. Irish Americans were not the first, however, to celebrate the feast of St Patrick. Irish families have traditionally celebrated the feast of St Patrick as a religious holiday for thousands of years—a great pause during the Christian season of Lent when prohibitions were lifted for one day of dancing, drinking and feasting on meat. Corned beef and cabbage anyone?
The history of St Patrick's Day in America, however, begins with Irish soldiers serving in the British army. Befitting of the Irish, it is a tale of Irish patriotism and evolving political power. That very first parade in New York City not only helped the homesick Irish soldiers connect with their roots through the familiar strains of traditional Irish music—usually featuring bagpipes and drums, but also helped them to connect with one another, finding strength in numbers. Over the years as nearly a million Irish immigrants fled to America in the wake of the Great Potato Famine, St Patrick's Day parades became a display of solidarity and political strength as these often ridiculed Irish immigrants were frequently victims of prejudice. Soon enough, their numbers were recognized and the Irish soon organized and exerted their political muscle, becoming known as the “green machine”.
Today, St Patrick's Day celebrations abound. Decidedly less religious, St Patrick's Day celebrations continue to be a show of Irish strength and patriotism. So, get our your green and get ready to celebrate!
Happy St Patrick's Day
Irish Heritage Cabbage
25 m 4 servings 139 cals
Directions
- Prep
- Cook
- Ready In
- Preheat your oven's broiler.
- Place cabbage into a large pot. Add water and bring to a boil. Simmer over low heat until tender, about 15 minutes. Meanwhile, cook bacon in a skillet over medium-high heat until crisp. Drain and set aside. Drain cabbage, and drizzle with melted butter. Sprinkle with bacon and nutmeg. Transfer to a baking dish.
- Place under your oven's broiler until the top layer is lightly browned, about 5 minutes. Serve with salt, pepper and vinegar as desired.
-
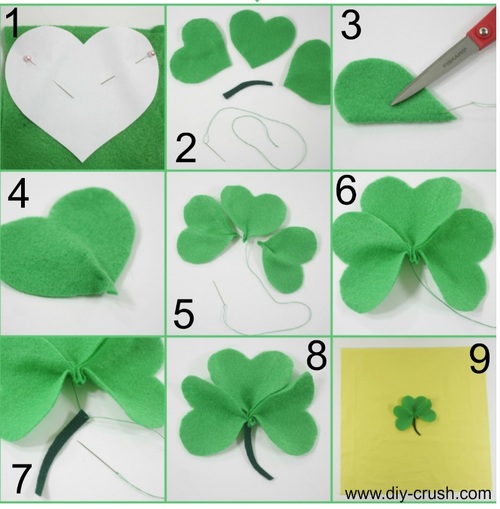
Felt Clover Easy Sewing Project

- Clover Pattern (click here)
- Kelly green felt ( 7” x 7” inches)
- Dark green felt (small piece)
- Scissors
- Double-threaded hand sew needle
- Instructions:

- 1. Pin the heart to the kelly green felt and cut around it. Repeat 2 more times.2. Cut out the stem. You should now have 3 hearts, 1 stem and a threaded hand sew needle3. Fold a heart in half and sew the bottom tip with a few stitches and a fold allowance of 1/4 inch. Cut your thread.4. This is how your heart looks now from the underside. Repeat with 2 other hearts.5. Place your 3 hearts side by side with the bottom tip facing and sew them together where you stitched before.6. This is how your (almost) clover will look like now.7. It’s time to sew the stem on.
8. And your clover is finished!
9. Sew your clover onto the One Hour DIY Pillow or another one of your favorite free sewing patterns. One Hour DIY Pillow
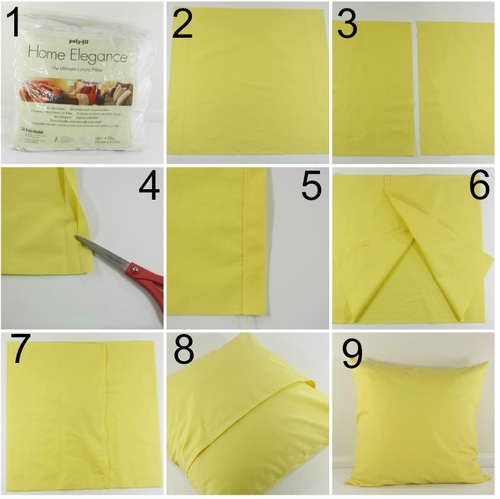
- Materials:
- Felt
- Scissors
- Needle for Hand Sewing
- Fabric (measure to fit pillow)
- Sewing Machine
- Iron
- Straight Pins
Note: Measurements may differ depending on the pillow form you are using.Instructions: 
- Select your pillow form and measures 20×20 inches.
2. Cut the front pillowcase to 21×21″ (note: if you are adding the Felt Clover Easy Seiwng Projects or other embellishment from the above tutorial now is the time to do that).
3. Cut 2 backside pillowcase pieces to 21×15″ each.
4. Fold the inner long edges of each backside pillowcase 1/2″ in and press, then fold again 1/2″ and press.
5. Sew the fold down on both pillowcase sides.
6. Place the inner pillowcase sides with right sides down onto the front pillowcase side which is right side up.
7. Pin and sew along all 4 sides and sew over each backside overlap twice to reinforce those (seam allowance = 3/8″).
8. Insert your pillow form into the envelope pillowcase (insert into the bottom envelope layer first).
9. Admire your finished pillow! - Lucky Four Leaf Clover Headband
- For this you will need:
Fabri-Tac fabric glue
Two different colors of green felt
1/4" green elastic or white elastic in the length needed to fit either your or your kids head
needle and thread - First I cut 4 1" by 1" squares out of each piece of felt (I just eyeballed this, no need to be accurate), then I cut the top into two mounds like a little heart. Next, use your needle and thread to sew the four pieces together as shown in the photos below, pull tight and tie off the end. Using your fabric glue, glue the elastic ends together and onto a square felt piece. Next on top of the elastic, glue your little clovers. Wait for it to dry and cut off the excess backing felt. Tada! New Four Leaf Clover Headband to wear on the 17th!
-
-


